You will need:
- T-shirt yarn in 3 colors. I used Mini Nooodle yarn (reviewed HERE) by Scheepjes in shades 004, 035 and 259 - 2 skeins of each. You can purchase this yarn at Wool Warehouse HERE* or in your local Scheepjes shops.
- Crochet Clover Amour hook 10mm*
- Stuffing. You can use old duvet
- Zip. I made a closure with zip so that pillow throw is easy to take care of.
Measurements
My pillow is approx. 50cm (20in) large across.Gauge
Gauge is not critical for this pattern but try not to work too tight because then it will be difficult to insert the hook into 3rd loops. There are overlay stitches added on the surface of mandala – please, always make them to the height of working round. They should not pull.Important Notes
- This pillow is made with Camel crochet stitch. To obtain a look knit effect insert the hook into a 3rd loop. You can find a complete tutorial about how to work this stitch and how to join the rounds with a less invisible joining seam HERE.
- Because of tight tension, it may be difficult to insert the hook into a 3rd loop, so please don’t crochet too tight. If you still find it impossible, feel free to switch to a smaller hook and crochet loosely than usually.
- Ch1 in the beginning of each rnd doesn’t count as sc. 1st sc of every rnd is made in the same st as ss join.
- Don’t cut yarn after each round but carry it behind your work. To change color make ch1 in the beginning of each rnd with new shade (unless otherwise is stated in the pattern).
- Don’t forget to skip 1 stitch of previous round behind every “overlay” dc on rnds 18 and 23.
Stitch guide and Abbreviations (US terms)
rnd roundst(s) stitch(es)
ch chain
yo yarn over
lp(s) loop(s)
sk skip st(s)
ss (slip stitch) – insert hook in indicated st, yo, draw yarn up and pull 2nd lp through the 1st lp on hook.
sc (single crochet) – insert hook in indicated stitch, yo, draw up a lp, yo and pull through both lps on hook.
dc (double crochet) – yo, insert hook in indicated st, yo, draw up a lp, *yo, pull through 2 lps* twice.
*…* *crochet following directions* as many times as indicated
[…] [crochet following directions] as many times as indicated
Add this pattern to your Ravelry Queue
INSTRUCTIONS
Color Key: C1 - 004, C2 - 259, C3 - 035Copyright LillaBjornCrochet 2017. All rights reserved. This pattern is for unlimited personal use only. Do not reproduce or sell the pattern. The pattern may not be copied in any way (print or digitally), in part or in full. Items may be sold that are made from this pattern as long as the designer is credited. Shop owners, if you wish to make a kit with yarn using this pattern, please request permission and copyright details from me before offering any kits for sale. Please, read Copyright page for more information.
Mandala (make two)
Rnd 1. With C1 make a magic ring, ch1 (doesn’t count as sc here and throughout) and 6 sc into a magic ring. Join the round with slip stitch (ss) in 1st sc of the round after ch1 (insert the hook under both loops (front and back).
Rnd 2. Change to C2 making ch1 with new color (here and throughout).
NOTE: On this and next rnds you will be working in 3rd loops of the stitches from previous rnd (unless otherwise stated in the pattern). 1st sc is made in the same stitch as join (here and throughout).
Ch1, 2sc (3rd lp) in each stitch around; join with ss in 1st sc after ch1. (12 sts)
Rnd 3. Change to C3. Ch1, *1sc, 2sc in next st* 6 times; join with ss in 1st sc after ch1. (18 sts)
Rnd 4. Change to C1. Ch1, *1sc in next 2 sts, 2sc in next st* 6 times; join with ss in 1st sc after ch1. (24 sts)
Rnd 5. Change to C2. Ch1, *1sc in next st, 2sc in next st, 1sc in next 2 sts* 6 times; join with ss in 1st sc after ch1. (30 sts)
Rnd 6. Change to C3. Ch1, *1sc in next 4 sts, 2sc in next st* 6 times; join with ss in 1st sc after ch1. (36 sts)
Rnd 7. Change to C1. Ch1, *1sc in next 2 sts, 2sc in next st, 1sc in next 3 sts* 6 times; join with ss in 1st sc after ch1. (42 sts)
Rnd 8. Change to C2. Ch1, *1sc in next 6 sts, 2sc in next st* 6 times; join with ss in 1st sc after ch1. (48 sts)
Rnd 9. Change to C3. Ch1, *1sc in next 3 sts, 2sc in next st, 1sc in next 4 sts* 6 times; join with ss in 1st sc after ch1. (54 sts)
Rnd 10. Change to C1. Ch1, *1sc in next 8 sts, 2sc in next st* 6 times; join with ss in 1st sc after ch1. (60 sts)
Rnd 11. Change to C2. Ch1, *1sc in next 4 sts, 2sc in next st, 1sc in next 5 sts* 6 times; join with ss in 1st sc after ch1. (66 sts)
Rnd 12. Change to C3. Ch1, *1sc in next 10 sts, 2sc in next st* 6 times; join with ss in 1st sc after ch1. (72 sts)
Rnd 13. Change to C1. Ch1, *1sc in next 5 sts, 2sc in next st, 1sc in next 6 sts* 6 times; join with ss in 1st sc after ch1. (78 sts)
Rnd 14. Change to C2. Ch1, *1sc in next 12 sts, 2sc in next st * 6 times; join with ss in 1st sc after ch1. (84 sts)
Rnd 15. Change to C3. Ch1, *1sc in next 6 sts, 2sc in next st, 1sc in next 7 sts* 6 times; join with ss in 1st sc after ch1. (90 sts)
Rnd 16. Change to C1. Ch1, 90sc; join with ss in 1st sc after ch1. (90 sts)
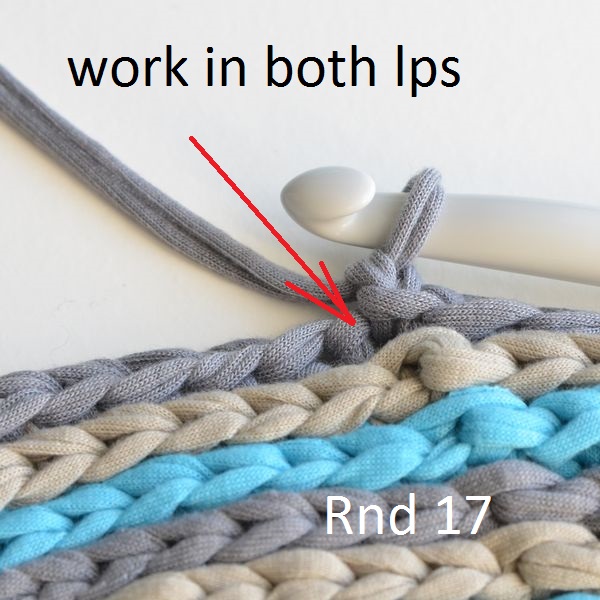
Rnd 17. Continue with C1. Work in both lps!
Ch1, *1sc in next 14 sts, 2sc in next st* 6 times; join with ss in 1st sc after ch1. (96 sts)
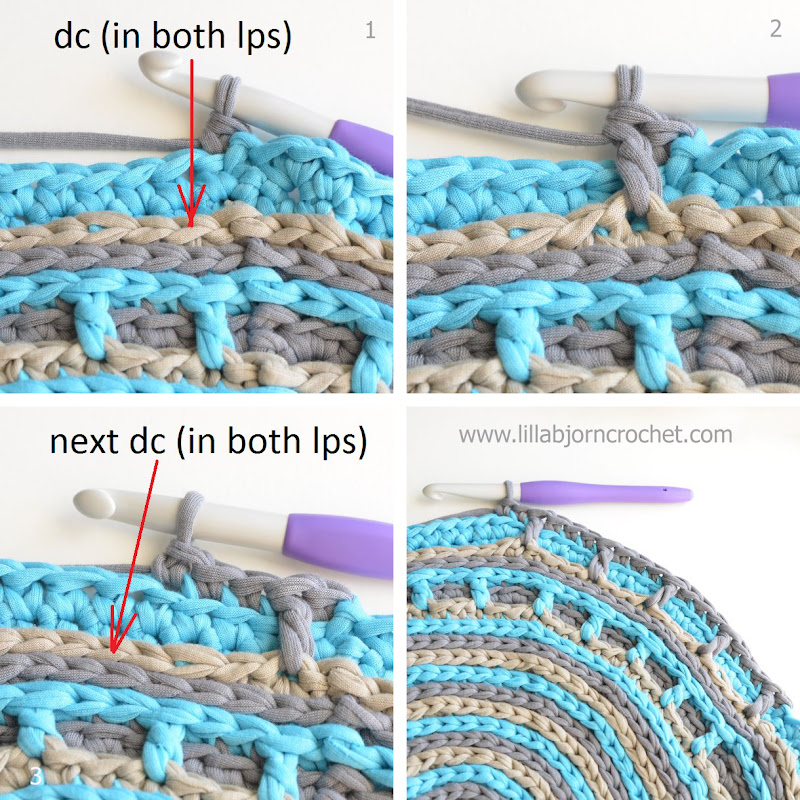
Rnd 18. Change to C2. Work all sc in BL.
Note: on rnd 15 you will have 2 sts skipped between dc’s.
Ch1, *1sc on rnd 17, [1dc a st of rnd 15 (in both lps) which is directly below next st of rnd 17, skip 1 st on rnd 17 behind dc just made, 1sc in next 2 sts of rnd 17] 5 times* repeat to the end; join with ss in 1st sc after ch1. (96 sts)
Rnd 19. Change to C1. Work in 3rd lp.
Ch1, *1sc in next 7 sts, 2sc in next st, 1 sc in next 8 sts* 6 times; join with ss in 1st sc after ch1. (102 sts)
Rnd 20. Change to C3. Work in 3rd lp. Ch1, *1sc in next 16 sts, 2sc in next st* 6 times; join with ss in 1st sc after ch1. (108 sts)
Rnd 21. Change to C3. Work in 3rd lp. Ch1, *1sc in next 8 sts, 2sc in next st, 1 sc in next 9 sts* 6 times; join with ss in 1st sc after ch1. (114 sts)
Rnd 22. Continue with C3. Work in both lps! Ch1, *1sc in next 18 sts, 2sc in next st* 6 times; join with ss in 1st sc after ch1. (120 sts)
Rnd 23. Change to C1. Work all sc in BL and attach dc’s in the same way as on rnd 18.
Note: on rnd 20 you will have 2 or 3 sts skipped between dc.
Ch1, *1sc on rnd 22, 1dc in a st of rnd 20 (in both lps) which is directly below next st of rnd 22, skip 1 st on rnd 22 behind dc just made, 1sc in next 2 sts on rnd 22* repeat to the end; join with ss in 1st sc after ch1. (120 sts)
Rnd 24. Change to C3. Work in 3rd lp. Ch1, *1sc in next 9 sts, 2sc in next st, 1sc in next 10 sts* 6 times; join with ss in 1st sc after ch1. (126 sts)
Rnd 25. Change to C2. Work same as on rnd 24. (126 sts)
Rnd 26. Continue with C2. Work through both lps. Ch1, 126sc; join with ss in 1st sc after ch1. (126 sts)
If you want you can make your pillow larger by adding a few more rounds:
Rnds. 27-30. Same as Rnd 26 (I used C1 for rnds 27-28, C3 for rnds 29-30). Join with ss in 1st sc after ch1. (126 sts) Fasten off.
Congratulations! Your mandala is finished!
Putting pillow together
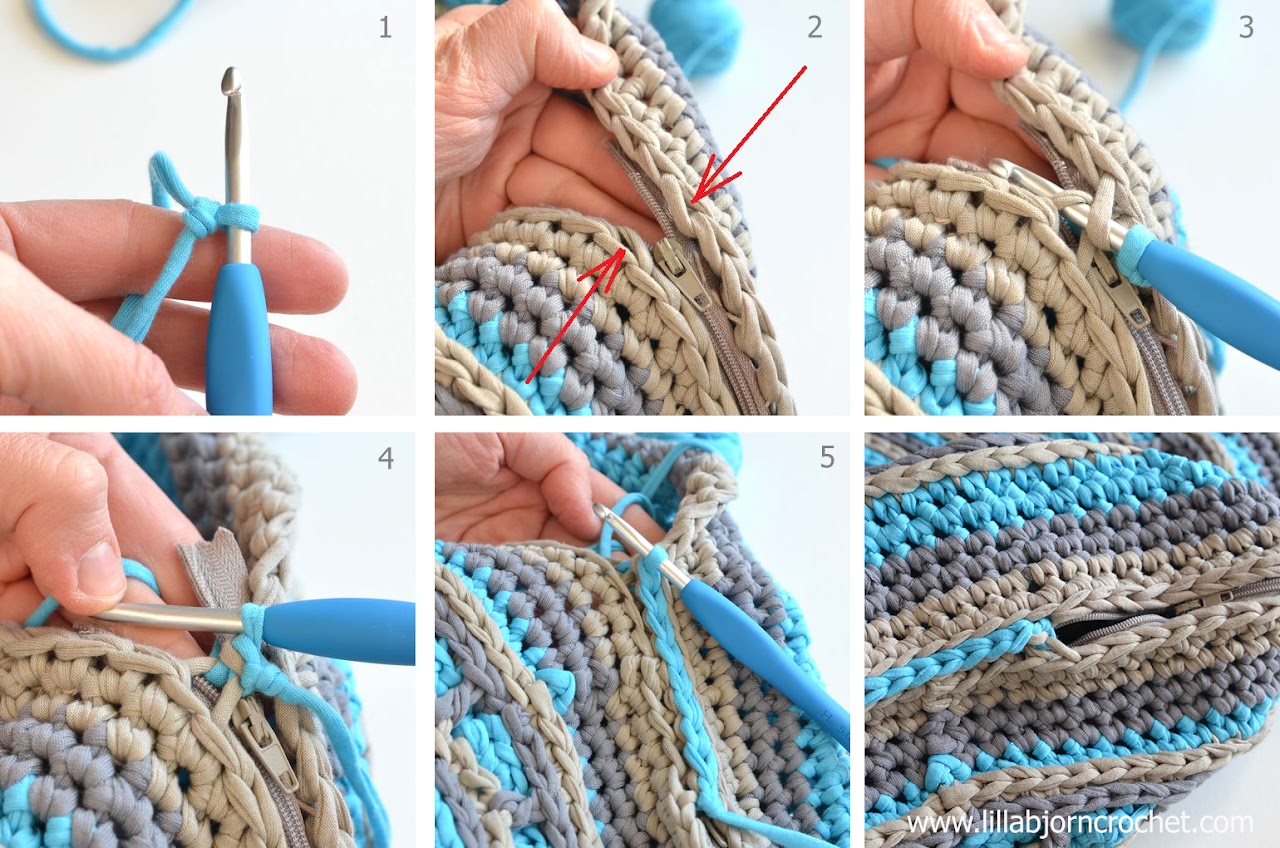
If you don't wish to make any closure, join two mandala’s together using a “flat zip” method and yarn C2. Leave s small opening and stuff your pillow. Then continue to join, fasten off and weave in yarn tail in.For a zip closure - pin zip to front mandala with a few sewing pins and then sew it with running stitch using a needle and yarn of the same color as on the last round of mandala. Because T-shirt yarn is too big for sewing, I used Sport weight cotton yarn of the same shade.
Then pin another half of the zip to the back part of your pillow. Make sure you cover with zip exactly the same amount of stitches (of the last round) as on the front mandala. Sew zip to the back with the same yarn.
Place front and back parts with wrong sides facing each other. With C2 make a slip knot and start joining both parts with "flat zip method" inserting the hook in back loops on both front and back part. The 1st stitch is made right after the zip ends. When you come to the beginning of zip, fasten off and weave all yarn tails in.
Subscribe to a newsletter not to miss a single post. You can also follow me on Facebook, Pinterest and Instagram.

* thank you for using my affiliate links. It costs you nothing and helps to support my blog.


Beautiful work!!!! Thank you for sharing. Congratulations!
ReplyDelete