Today I was trying to remember what my life was before I decided to design Circles of the Sun CAL. And I couldn’t really remember. During last 6 months I am living with the thoughts about it every day. One day I got a message on Facebook from my friend Joana. She sent me a link to Derdi’s Sophie Universe (yes-yes, this is how it all started) and said: "Yay! I must do that!" I remember that I was under a huge impression from what I saw. Many times I wrote how much I admire Dedri and her creative work. Do you actually know that she is following Circles of the Sun now? I couldn’t believe that, and I am so happy!
I should probably feel a shame but a year ago I didn’t even know what CAL means… I am just an introvert designer spending all my free time with the hook and yarns. I was not informed at all about what is happening in the world of crochet. I just feel a great passion towards what I am doing… And half a year ago I decided to design my own (first) CAL. I was not sure what it should be, if I manage it or not, if I have enough experience, if someone joins, if I could design something beautiful.
I usually don't wait for an inspiration. The most important part of designing (for me) is to take hook at right time. Sometimes you have an idea and even a drawing, sometimes you don’t have any thoughts at all. And then you sit down and start to crochet… And after a while you notice that something starts to grow in your hands and you understand – this is what you were waiting for… Yesterday I saw a TV program about classical composers and if it’s possible to describe in words the process of creating music. It’s not possible. The same is with crochet design, I guess.
I don't even know why I am writing all this now. A few days ago I was asked when I plan my next CAL. And I started to think about this. There are so many ideas out there and in my head. I would be grateful for 89 hours a day instead of 24, and for 234 hands instead of two. To make a CAL is not something you can do in a week or in a month. It takes lots of efforts, time and not only yours, but all the people who are helping you – fantastic testers (I will for sure name ALL of them in next posts), translators, video maker, group moderators on Facebook and Ravelry. It’s a huge job made by a team of many people.
I will definitely think about future CAL, but a little bit later. And now (ta-dah!) let me introduce Block #7. Another favourite of mine. It will for sure look great in any color combination!
Please, check General Information, Part 1, Part 2, Part 3, Part 4, Part 5 and Part 6 of this CAL. All granny squares are designed in overlay crochet technique. Please, also check this post to read more about it.
Dutch by Dianne Baan
German by Libminna
Portuguese by Estela Mizukawa
Video tutorial by Esther Dijkstra of It’s all in a Nutshell
*1 dc inc in each st of rnd 1 (the 1st dc of the rnd will be ch2)* 12 times, NJ in the 1st dc of the rnd after ch2. (= 24 dc)
Rnd 3. Change to yarn C1. Attach yarn in 2nd dc (BL) of any dc inc of rnd 2. Work this rnd in BL!
Note: when you start every new petal, make the 1st tr of every tr3tog in a st of rnd 1 where the last tr of previous tr3tog was made. You will get 6 petals on this rnd.
*2 sc (the 1st sc of the rnd will be a ch), 1 tr3tog (FL) (work 1st tr (FL) in a st of rnd 1 where the previous dc inc of rnd 2 was made and then work 1 tr (FL) in each of two next sts on rnd 1), sk no sts on rnd 2, 1 sc, 1 sc inc* 6 times, NJ in the 1st sc of the rnd after ch1. (= 36 sts)
Rnd 4. Change to yarn C4. Attach yarn in any tr3tog (BL) of rnd 3. Work this rnd in BL!
Note: increases will be made in tr3tog’s and 2nd sc of every inc of rnd 3.
*1 dc inc (the 1st dc of the rnd will be ch2), 2 dc * 12 times, NJ in the 1st dc of the rnd after ch2. (= 48 sts)
Rnd 5. Change to yarn C6. Attach yarn in 1st dc (BL) of any dc inc of rnd 4 above tr3tog. Work this rnd in BL!
Note: tr’s are made in tr3tog’s and 2nd st of every inc of rnd 4.
*1 sc (the 1st sc of the rnd will be a ch), 1 tr (FL) in the underlying tr3tog, sk no sts on rnd 4, 4 sc, 1 tr (FL) in 2nd sc of underlying sc inc of rnd 3, sk no sts on rnd 4, 3 sc* 6 times, NJ in the 1st sc of the rnd after ch1. (= 60 sts)
Rnd 6. Change to yarn C3. Attach yarn in any tr (BL) of rnd 5. Work this rnd in BL.
Note: dc inc’s are made in tr’s of rnd 5.
*1 dc inc (the 1st dc of the rnd will be ch2), 4 dc*12 times, NJ in the 1st dc of the rnd after ch2. (= 72 sts)
Rnd 7. Change to yarn C2. Attach yarn in any tr (FL) of rnd 5. Work this rnd in FL on rnd 5.
*1 sl st in tr (the 1st sl st of the rnd will be ch1), 1 hdc in next st, [1 dc inc in next st] twice, 1 hdc* 12 times, finish with a sl st in the same st in the beginning of the rnd where the yarn was attached. Pull both tails to the wrong side and fasten with a knot. (= 84 sts)
Rnd 8. Change to yarn C5. Attach yarn in 2nd dc (BL) of any dc inc of rnd 6 above tr3tog of rnd 3. Work this rnd in BL! After this rnd you will get 4 corners.
*3 sc (the 1st sc of the rnd will be a ch), 1 hdc, 2 dc, 2 tr, 2 tr in next st, ch2, 2 tr in next st, 2 tr, 2 dc, 1 hdc, 3 sc* 4 times, NJ in the 1st sc of the rnd after ch1. (= 80 sts + 4 ch2-sps)
Rnd 9. Change to yarn С1. Attach yarn in the 1st sc (BL) of any group of six of rnd 8. Work this rnd in BL!
*12 sc (the 1st sc of the rnd will be a ch), 1 hdc, 2 dc in next ch2-sp, ch2, 2dc in the same ch2-sp, 1 hdc, 6 sc* 4 times, NJ in the 1st sc of the rnd after ch1. (= 96 sts + 4 ch2-sps)
Don't forget to show off your finished blocks on Ravelry and Facebook! The variety of your colors and textures make me very happy :) You can also find a pin for this block on Pinterest - please, feel free to repin it and share with your friends!
Remember to subscribe to a weekly newsletter not to miss a single pattern and tutorial. And you can also follow me on Facebook, Pinterest and Instagram.

Please, also watch video by Esther Dijkstra (It’s all in a Nutshell).
I should probably feel a shame but a year ago I didn’t even know what CAL means… I am just an introvert designer spending all my free time with the hook and yarns. I was not informed at all about what is happening in the world of crochet. I just feel a great passion towards what I am doing… And half a year ago I decided to design my own (first) CAL. I was not sure what it should be, if I manage it or not, if I have enough experience, if someone joins, if I could design something beautiful.
I usually don't wait for an inspiration. The most important part of designing (for me) is to take hook at right time. Sometimes you have an idea and even a drawing, sometimes you don’t have any thoughts at all. And then you sit down and start to crochet… And after a while you notice that something starts to grow in your hands and you understand – this is what you were waiting for… Yesterday I saw a TV program about classical composers and if it’s possible to describe in words the process of creating music. It’s not possible. The same is with crochet design, I guess.
I don't even know why I am writing all this now. A few days ago I was asked when I plan my next CAL. And I started to think about this. There are so many ideas out there and in my head. I would be grateful for 89 hours a day instead of 24, and for 234 hands instead of two. To make a CAL is not something you can do in a week or in a month. It takes lots of efforts, time and not only yours, but all the people who are helping you – fantastic testers (I will for sure name ALL of them in next posts), translators, video maker, group moderators on Facebook and Ravelry. It’s a huge job made by a team of many people.
I will definitely think about future CAL, but a little bit later. And now (ta-dah!) let me introduce Block #7. Another favourite of mine. It will for sure look great in any color combination!
Please, check General Information, Part 1, Part 2, Part 3, Part 4, Part 5 and Part 6 of this CAL. All granny squares are designed in overlay crochet technique. Please, also check this post to read more about it.
TRANSLATIONS
Dutch by Dianne Baan
German by Libminna
Portuguese by Estela Mizukawa
Video tutorial by Esther Dijkstra of It’s all in a Nutshell
You will need:
• Yarn in 6 colors. I used yarn “Cotton Light” by DROPS (50g/1.76 oz., 105 m/115 yds.) Yarn weight: DK. Texture: 8 ply (11 wpi)
• Crochet hook 3,25 mm (D) or size needed to obtain acceptable gauge. (Please, feel free to choose another yarn weights and the hook to get larger or smaller square).
• Scissors, tapestry needle to weave in ends (I prefer crochet hook for weaving in).
US standard abbreviations are used in this pattern. But if you are used to other terms, please check this Crochet Translation Project which might be helpful in translation to your language.
rnd - round
st(s) - stitch(es)
slst (slip stitch) - insert hook in indicated st, yo, draw yarn up and pull 2nd lp through the 1st lp on hook.
sc (single crochet) – insert hook in indicated stitch, yo, draw up a lp, yo and pull through both lps on hook.
ch - chain
sp(s) - space(s)
sc (single crochet) - insert hook in indicated stitch, yo, draw up a lp, yo and pull through both lps on hook.
hdc (half double crochet) - yo, insert hook in indicated st, yo, draw up a lp, yo, pull through all three lps.
dc (double crochet) - yo, insert hook in indicated st, yo, draw up a lp, *yo, pull through 2 lps* twice.
tr (treble crochet) - yo twice, insert hook in indicated st, yo, draw up a lp, *yo, pull through 2 lps* three times.
tr3tog (treble crochet 3 together) - *yo twice, insert hook in indicated st, yo, draw up a lp, [yo, pull through 2 lps] twice* 3 times, yo, pull through all 4 lps on hook.
inc(s) - increase(s)
sc inc (single crochet increase) – crochet two sc in the same st.
dc inc (double crochet increase) – crochet two dc in the same st.
yo - yarn over
lp(s) - loop(s)
FL - front loop(s)
BL - back loop(s)
sk - skip st(s)
NJ - needle join
*…* - *crochet following directions* as many times as indicated
Copyright LillaBjornCrochet 2015. All rights reserved. This pattern is for unlimited personal use only. Do not reproduce or sell the pattern. The pattern may not be copied in any way (print or digitally), in part or in full. Items may be sold that are made from this pattern as long as the designer is credited. Shop owners, if you wish to make a kit with yarn using this pattern, please request permission and copyright details from me before offering any kits for sale. Please, read Copyright page for more information.
Color Key: C1 – Yellow, C2 – Beige, C3 – Orange, C4 – Green, C5 - Gray, C6 – Ruby.
• Crochet hook 3,25 mm (D) or size needed to obtain acceptable gauge. (Please, feel free to choose another yarn weights and the hook to get larger or smaller square).
• Scissors, tapestry needle to weave in ends (I prefer crochet hook for weaving in).
Size
The size of the finished square depends on the yarn and hook you use. My square is approx. 12.5 cm (5 inches) large.Stitch guide and Abbreviations
US standard abbreviations are used in this pattern. But if you are used to other terms, please check this Crochet Translation Project which might be helpful in translation to your language.
rnd - round
st(s) - stitch(es)
slst (slip stitch) - insert hook in indicated st, yo, draw yarn up and pull 2nd lp through the 1st lp on hook.
sc (single crochet) – insert hook in indicated stitch, yo, draw up a lp, yo and pull through both lps on hook.
ch - chain
sp(s) - space(s)
sc (single crochet) - insert hook in indicated stitch, yo, draw up a lp, yo and pull through both lps on hook.
hdc (half double crochet) - yo, insert hook in indicated st, yo, draw up a lp, yo, pull through all three lps.
dc (double crochet) - yo, insert hook in indicated st, yo, draw up a lp, *yo, pull through 2 lps* twice.
tr (treble crochet) - yo twice, insert hook in indicated st, yo, draw up a lp, *yo, pull through 2 lps* three times.
tr3tog (treble crochet 3 together) - *yo twice, insert hook in indicated st, yo, draw up a lp, [yo, pull through 2 lps] twice* 3 times, yo, pull through all 4 lps on hook.
inc(s) - increase(s)
sc inc (single crochet increase) – crochet two sc in the same st.
dc inc (double crochet increase) – crochet two dc in the same st.
yo - yarn over
lp(s) - loop(s)
FL - front loop(s)
BL - back loop(s)
sk - skip st(s)
NJ - needle join
*…* - *crochet following directions* as many times as indicated
Copyright LillaBjornCrochet 2015. All rights reserved. This pattern is for unlimited personal use only. Do not reproduce or sell the pattern. The pattern may not be copied in any way (print or digitally), in part or in full. Items may be sold that are made from this pattern as long as the designer is credited. Shop owners, if you wish to make a kit with yarn using this pattern, please request permission and copyright details from me before offering any kits for sale. Please, read Copyright page for more information.
Color Key: C1 – Yellow, C2 – Beige, C3 – Orange, C4 – Green, C5 - Gray, C6 – Ruby.
Instructions
Rnd 1. Start with yarn C2.
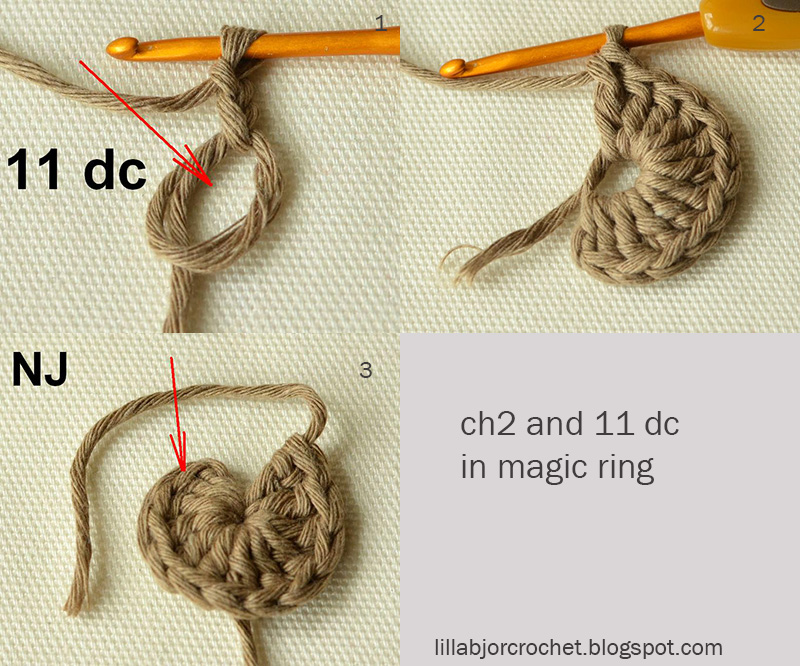
Make magic ring, ch2 (counts as 1st dc) and 11 dc in magic ring; NJ in the 1st dc after ch2. (= 12 dc)
Rnd 2. Change to yarn C5. Attach yarn in any dc of rnd 1. Work this rnd in BL!Make magic ring, ch2 (counts as 1st dc) and 11 dc in magic ring; NJ in the 1st dc after ch2. (= 12 dc)
*1 dc inc in each st of rnd 1 (the 1st dc of the rnd will be ch2)* 12 times, NJ in the 1st dc of the rnd after ch2. (= 24 dc)
Rnd 3. Change to yarn C1. Attach yarn in 2nd dc (BL) of any dc inc of rnd 2. Work this rnd in BL!
Note: when you start every new petal, make the 1st tr of every tr3tog in a st of rnd 1 where the last tr of previous tr3tog was made. You will get 6 petals on this rnd.
*2 sc (the 1st sc of the rnd will be a ch), 1 tr3tog (FL) (work 1st tr (FL) in a st of rnd 1 where the previous dc inc of rnd 2 was made and then work 1 tr (FL) in each of two next sts on rnd 1), sk no sts on rnd 2, 1 sc, 1 sc inc* 6 times, NJ in the 1st sc of the rnd after ch1. (= 36 sts)
Rnd 4. Change to yarn C4. Attach yarn in any tr3tog (BL) of rnd 3. Work this rnd in BL!
Note: increases will be made in tr3tog’s and 2nd sc of every inc of rnd 3.
*1 dc inc (the 1st dc of the rnd will be ch2), 2 dc * 12 times, NJ in the 1st dc of the rnd after ch2. (= 48 sts)
Rnd 5. Change to yarn C6. Attach yarn in 1st dc (BL) of any dc inc of rnd 4 above tr3tog. Work this rnd in BL!
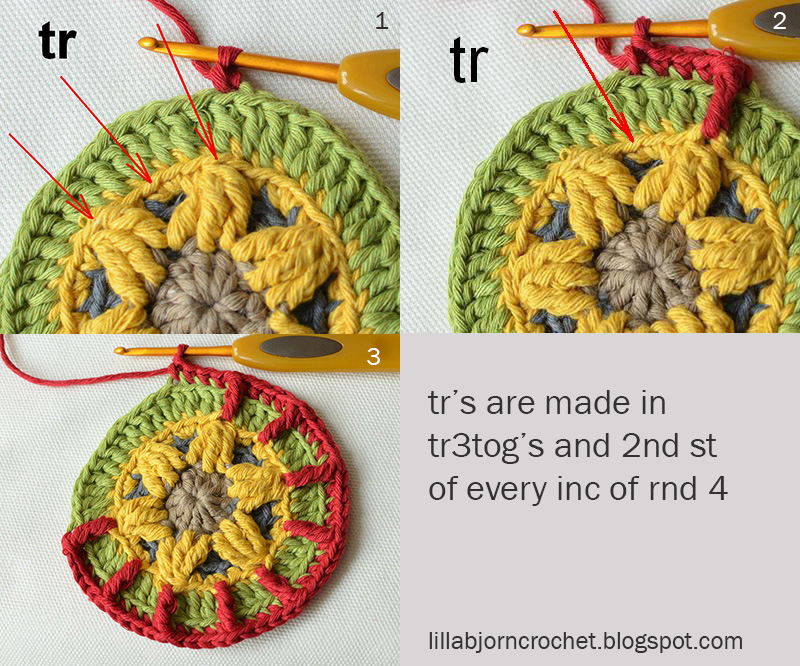
Note: tr’s are made in tr3tog’s and 2nd st of every inc of rnd 4.
*1 sc (the 1st sc of the rnd will be a ch), 1 tr (FL) in the underlying tr3tog, sk no sts on rnd 4, 4 sc, 1 tr (FL) in 2nd sc of underlying sc inc of rnd 3, sk no sts on rnd 4, 3 sc* 6 times, NJ in the 1st sc of the rnd after ch1. (= 60 sts)
Rnd 6. Change to yarn C3. Attach yarn in any tr (BL) of rnd 5. Work this rnd in BL.
Note: dc inc’s are made in tr’s of rnd 5.
*1 dc inc (the 1st dc of the rnd will be ch2), 4 dc*12 times, NJ in the 1st dc of the rnd after ch2. (= 72 sts)
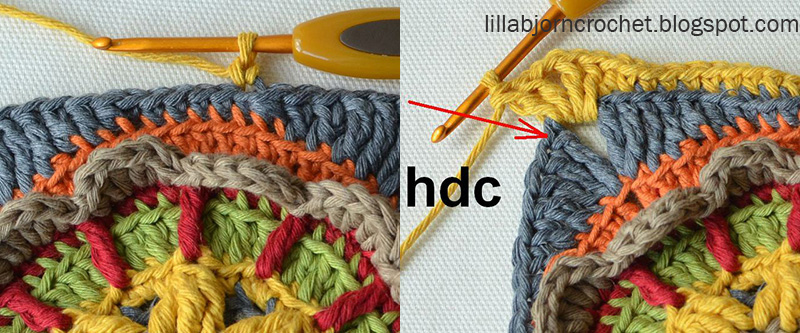
Rnd 7. Change to yarn C2. Attach yarn in any tr (FL) of rnd 5. Work this rnd in FL on rnd 5.
*1 sl st in tr (the 1st sl st of the rnd will be ch1), 1 hdc in next st, [1 dc inc in next st] twice, 1 hdc* 12 times, finish with a sl st in the same st in the beginning of the rnd where the yarn was attached. Pull both tails to the wrong side and fasten with a knot. (= 84 sts)
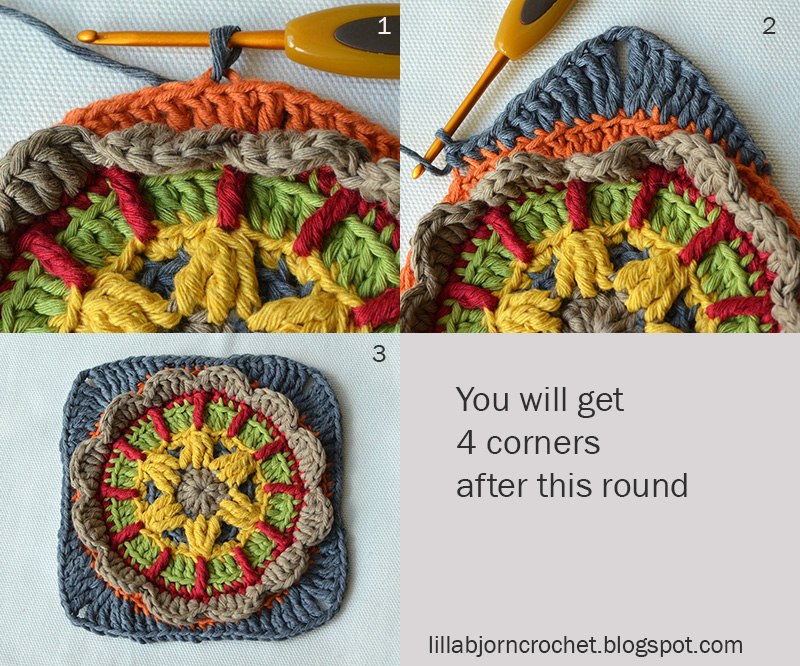
Rnd 8. Change to yarn C5. Attach yarn in 2nd dc (BL) of any dc inc of rnd 6 above tr3tog of rnd 3. Work this rnd in BL! After this rnd you will get 4 corners.
*3 sc (the 1st sc of the rnd will be a ch), 1 hdc, 2 dc, 2 tr, 2 tr in next st, ch2, 2 tr in next st, 2 tr, 2 dc, 1 hdc, 3 sc* 4 times, NJ in the 1st sc of the rnd after ch1. (= 80 sts + 4 ch2-sps)
Rnd 9. Change to yarn С1. Attach yarn in the 1st sc (BL) of any group of six of rnd 8. Work this rnd in BL!
*12 sc (the 1st sc of the rnd will be a ch), 1 hdc, 2 dc in next ch2-sp, ch2, 2dc in the same ch2-sp, 1 hdc, 6 sc* 4 times, NJ in the 1st sc of the rnd after ch1. (= 96 sts + 4 ch2-sps)
Congratulations! Your block 7 is now finished!
p.s. you may add a round of surface slip stitches in the very center of the flower if you wish :)
Remember to subscribe to a weekly newsletter not to miss a single pattern and tutorial. And you can also follow me on Facebook, Pinterest and Instagram.

Please, also watch video by Esther Dijkstra (It’s all in a Nutshell).


Hi Tatsiana,
ReplyDeletethank you for this new happiness. A nice evening
CU Mela
Wow, each new block prettier than the last one!!
ReplyDeleteI'm saving them up to do them later in the year, finishing a few other projects first.
Thanks for sharing your talent!!
Goodwool wishes
Rene
Thank you Tatsiana for sharing another beautiful block design! I am very much enjoying your CAL. Thank you for all your hard work :D
ReplyDeleteThank you very much!!! I am so happy you enjoy this CAL. I hope you will love your pillow when it's finished :)
ReplyDeleteI think its beautiful
DeleteThanks so much Tatsiana! Yes, I love your CAL too - and all your other designs! Thanks for sharing! Wish you and yours a wonderful (creative) weekend..;) greetings from Sus
ReplyDeleteThis block is lovely, thanks very much, I am so enjoying this CAL.
ReplyDeleteJan
Merci, je garde précieusement vos indications car je pense utiliser ces grannies pour mon plaid façon groovyghan
ReplyDeleteIs there a print friendly version of this project, please? Thank you!
ReplyDeleteYes, please use a Print Friendly button which can be found at the bottom of (every) post.
ReplyDeleteApparently the "print friendly" button is not showing up on the post? I can't find it.
ReplyDeleteSometimes Print Friendly button acts in a very strange way... Please, try to reload the page, it should show up. thank you for understanding!
DeleteThanks so much, it's working for me now!
DeleteThank you so much for giving to us so many funny moments with this CAL. and thank you to Esther too. It's great to make every Circle with your help!
ReplyDeleteThank you Teresa! Esther is working very hard to make this CAL easier for everyone. I appreciate her work very much.
DeleteEsther is one of the best I've come across. She is clear, concise, it's easy to see what she is doing. Her explanations are understandable without being tedious, and she has a lovely voice to listen to. Well done to you both. Not sure what I'll do with my finished blocks yet. It's fun to look at what others have come up with. Your hard work and talent is much appreciated.,thanks.,Soffity.(Australia)
ReplyDeleteEsther is an excellent teacher. That's true :)
Delete