What is actually Christmas Blog Hop? It’s a series of blog posts from a few wonderful crochet designers and bloggers who publish festive and FREE Christmas patterns every day. Please, check Candy Cane Wine Cozy designed by CanaDutch and published yesterday, and you will also find a link to the previous post of another designer. It is a wonderful way to meet new designers and get acquainted with their blogs, isn’t it?
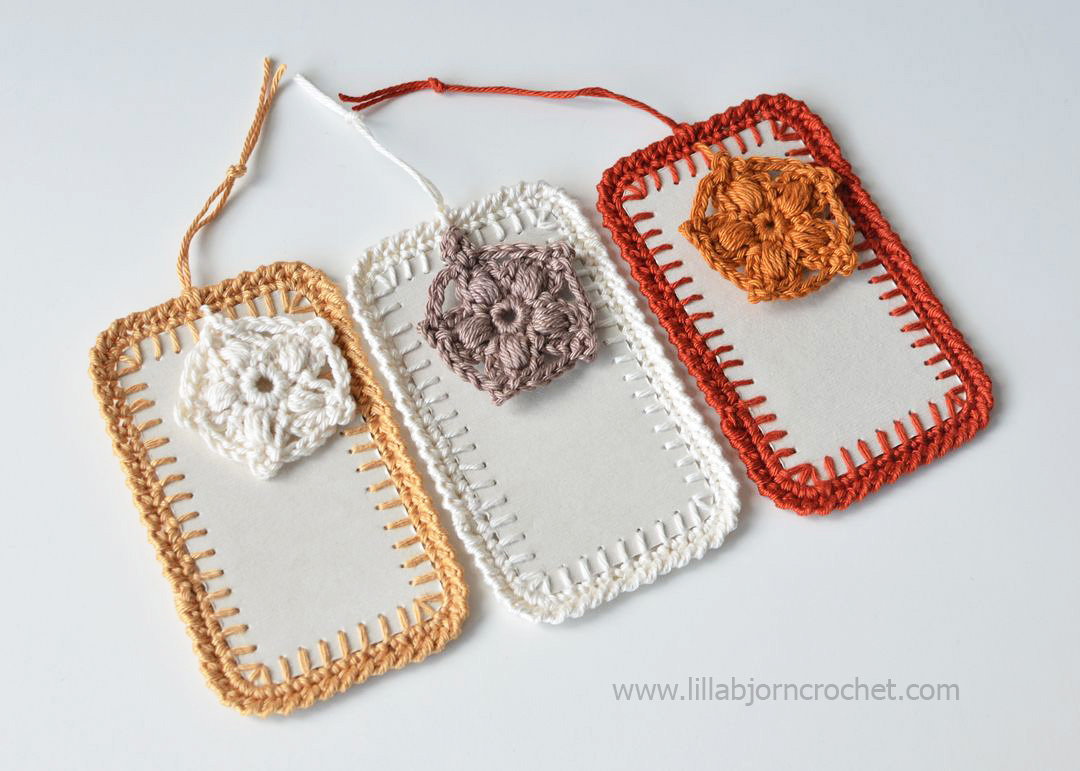
And here are instructions for my gift tag and star ornament. I hope you will have fun making it!
Copyright LillaBjornCrochet 2015. All rights reserved. This pattern is for unlimited personal use only. Do not reproduce or sell the pattern. The pattern may not be copied in any way (print or digitally), in part or in full. Items may be sold that are made from this pattern as long as the designer is credited. Shop owners, if you wish to make a kit with yarn using this pattern, please request permission and copyright details from me before offering any kits for sale. Please, read Copyright page for more information.
You will need:
- Leftovers of Fingering/Sport yarn in any shade. I used Catona by Scheepjes - approx 1-2g for a gift tag and 1g for star ornament. Catona yarn is really great as it comes in balls 50g AND 25g! You can check this yarn at Wool Warehouse* (international shipping) and Paradise Fibers* (US).
- Rectangles of firm paper 5cm X 9cm (the size of a standard business card). You can actually make a crochet border around your existing business card to give it a festive handmade look.
- Crochet hook 2,5mm
- Scissors
- Pencil
- Ruler
- Needle with large ear
- Awl, sharp needle or hole punch for paper
- Christmas gift (optional) :)
Stitch guide and Abbreviations
US standard abbreviations are used in this pattern. But if you are used to other terms, please check this Crochet Translation Project which might be helpful in translation to your native language.rnd - round
st(s) - stitch(es)
ch - chain
yo - yarn over
*…* *crochet following directions* as many times as indicated
sl st (slip stitch) – insert hook in indicated st, yo, draw yarn up and pull 2nd lp through the 1st lp on hook.
sc (single crochet) – insert hook in indicated stitch, yo, draw up a lp, yo and pull through both lps on hook.
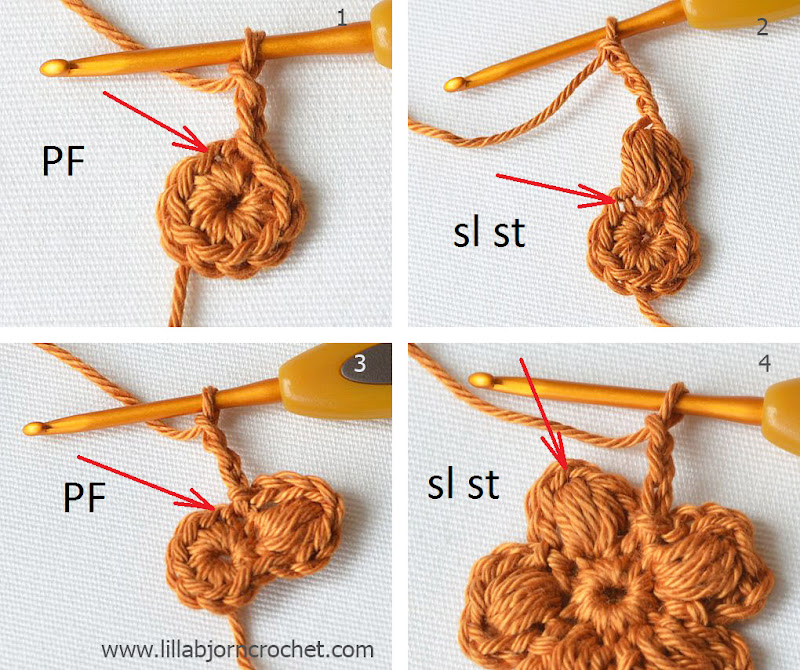
PF (puff stitch) – yo, insert hook in indicated stitch, yo, pull through lp, *yo, insert hook in the same st, yo, pull through lp* 3 times, yo, pull through 9 lps on hook.
Crab st (reverse sc) is always worked on right side and in the opposite direction than usual – attach yarn as required, 1 ch, * insert hook into the next st on right if you are right-handed (left st for lefties), yo, draw up a lp, yo, draw through both lps on hook, repeat from * across.
Blanket stitch (sewing)
INSTRUCTIONS - Gift Tag
Add this Pattern to your Ravelry QueueFirst you will need to make holes along the edges of your paper card (first mark them with a pencil using a ruler, so that all the distances are equal). I marked the positions of future holes in approx. 5mm from each edge: 1 hole in each corner, 15 holes along the long side of the card and 7 holes along the short side. The distance between each pair of holes is 5mm.
When all the holes are marked, cut all four corners with scissors to give them a half-circle shape.
Now you should make the holes using an awl, sharp needle of a hole punch for paper. If you use an awl or sharp needle, your card will get right and wrong sides, as the holes will look not very neat on the wrong side. But it should be not visible after the holes are filled with yarn.
Rnd 1. Now make blanket stitches around the card using the needle and yarn tail approx. 120-130cm (48-52 inches). It should be enough to work around a standard sized business card. Start making blanket stitches on one of the sides and make 3 stitches in each hole in the corner. When you are finished, cut the thread and secure both yarn tails with a knot. You can either crochet over these tails while making next round around the card, or weave them in later using the needle. I prefer to weave in tails with “as you go” method as it saves lots of time. You can check it HERE.
Rnd 2. Attach yarn of the same (or different ) shade in any loop on the edge formed by blanket stitches – simply pull the yarn under the loop and make a ch. Continue to crochet with sc in every loop along the edges and make 2sc in each of 2 loops in the corners. Make the last sc of this round in the same loop where you attached the yarn and join this round with sl st in the 1st sc of the round. Don’t fasten off. You should get 48 sc in total.
Rnd 3. Make ch1 and crochet with crab stitches (reverse sc) around the card - make 1 crab stitch in each sc till the end of the rnd. Join the round with sl st and fasten off. Weave in all yarn tails.
Congratulations! Your Gift Tag is finished!
Now you can make a small star ornament to use it together with the gift tag.
INSTRUCTIONS - Star Ornament (Garland)
Rnd 1. Make a magic ring, ch1 (doesn’t count as sc) and 10sc into the ring. Join with sl st in the 1st sc of the rnd.
Rnd 2. Ch2, *PF in next st, ch3, sl st in next st, ch3* 5 times. Join with st st in the 1st PF.
Rnd 3. *Ch3, sl st in the same st, ch4, sl st in next PF* 5 times. Join with sl st in the 1st PF. Fasten off.
Ta-Dah! Your mini star ornament is also finished!
By the way you can make many of them using leftovers in different colors and join them into a cute and festive garland which will bright any party (and not only Christmas)! To join *ch15 (or make as many chain stitches as you wish) and 1sc in a ch3-space on one of the star's points. Repeat from * till all your stars are joined.
Don’t forget to check Carmen’s blog Crafty Queens tomorrow to see what she will prepare for you. I am sure it will be something wonderful!
And don't forget to subscribe to Weekly Newsletter not to miss a single post. And you can also follow me on Facebook, Pinterest and Instagram.


Thank you for such a cute new pattern! I love personalizing gift wrapping, it makes the whole gift more special I think.
ReplyDeleteThank you Maria! I also think that even if you give some purchased gifts - it is always great to add something handmade to wrapping.
DeleteThank you for the gift of your talent you share all year round.
ReplyDeleteHappy Holidays!
Cookiecat
Thank you! And Happy Holidays to you, too! :)
ReplyDeleteVery nice thank you for sharing
ReplyDelete